Egg drop project is a fun STEM activity. The reason it is widely used in science class and science fair, it is because it is a project based learning, and there are many ways to incorporate engineering design process and physics in the project. We did an egg drop project with straws quite successfully. This time we try a different material: paper. From our last egg drop project design with straws, we learned the key of a successful design is to direct the contact force away from the egg. After research, we decided on a paper funnel structure assisted with straws.
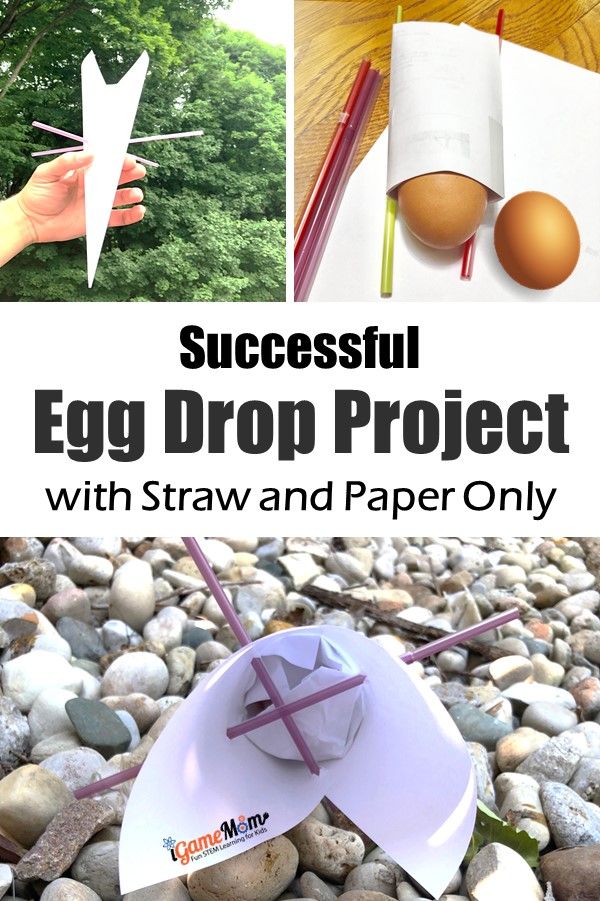
Materials Allowed for the Egg Drop Project
Regular print paper, straws, tape, egg. No other material is allowed.
First Egg Drop Project with Paper Design – Short Paper-only Funnel
For the first one, we just want to get a feel how it works. We only used half of the 8×11 paper to make the funnel, and we used paper only without straw. We taped a strip of paper on the open of the funnel to make sure the egg won’t jump out.
We tried twice, and both times it failed.
After the first failures, we discussed the design. We feel the design should work, as long as the tip of funnel is the part that hits the ground. That way the force goes along the direction of the side of the funnel, which should not have impact on the egg. However, after the funnel touched the ground, it will fall on the side. To prevent the side of funnel from hitting the ground, we decided to add two straws on top of the egg crossing through the funnel (as shown in the picture). This way the straw will hold the funnel to prevent the side from hitting the ground.

To add additional protection, we decided to make the funnel narrower, so the distance between the funnel tip and the egg becomes larger.
We also added some scrambled paper on top of the egg as a cushion to mediate the potential force between the egg and the straws.
Second Egg Drop Project with Straw and Paper Design – Paper Funnel with Straws
The 2nd design, we used the whole sheet of print paper. We made sure to make funnel tight with narrow open so the egg was about 3 inches away from the funnel tip.
After putting in a little scrambled paper at the top of the egg inside the funnel, we marked the position where we can stick the straws through the funnel above the egg.
Poking little holes on the paper for the straws to go through while maintaining the funnel shape was hard at first. I found the trick of folding the funnel paper a tiny little bit for the scissors to cut a tiny cut on the paper, then instead of poking a hole, just cut a cross, like “+”. Make sure the cut is slightly longer than the straws’ diameter.
After cutting the holes on the funnel, we thrust the straws through the holes to make a cross on top of the egg. You can see it from the picture above. Of course, we wanted to have the straws stick out of the funnel on 4 different directions.
We tried the new design.
The result?
Failed.
We tried twice, and twice the eggs cracked. However, the cracks were not big, so it was encouraging.
One observation we had was the funnel hit the ground with an angle ending up falling on the ground on the side. Although the straws helped a little bit, we still want the funnel tip be the part hitting the ground first.
One solution is to add some weight at the tip to make sure it is the part touching the ground first. But we were only allowed to use paper and straw.
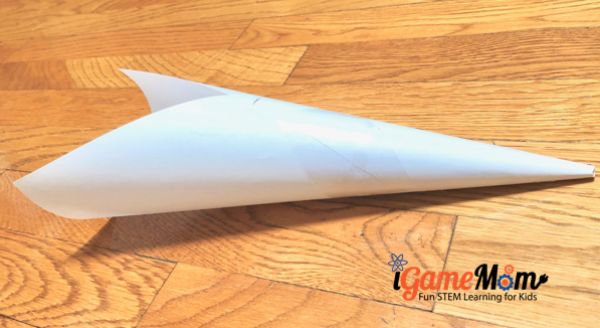
Another observation on the funnel helped us realize that the opening on one side of the funnel may have acted like the sail for the sailboat, causing air pushing the upright funnel tilt, thus the funnel fell on the ground on the side. You can see the opening on the funnel side from the picture above. It is simply due to the shape of the paper.
An easy fix is to tape a piece of paper to cover the opening. Another solution, if you don’t have limit on the pieces of paper can be used for the design, is to make another funnel to nest inside the first funnel, with one funnel covering the other’s open.
Third Egg Drop Project with Straw and Paper Design – Paper Funnel with Straws No Open on Side
We patched the open with a piece of paper using tape. See the picture below.
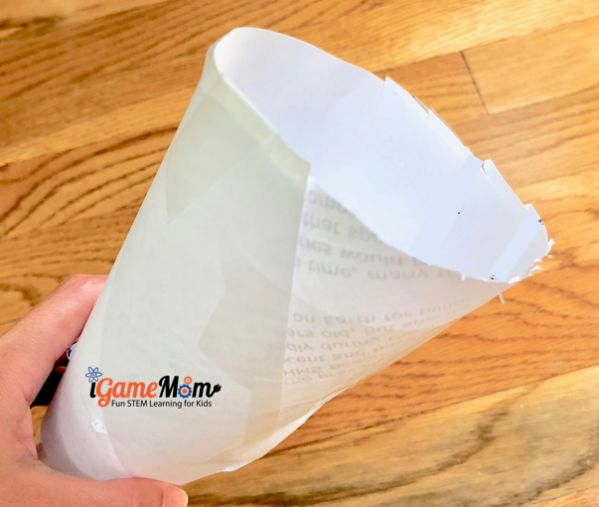
Now it is time to test it out.
No cracks!
We did it again. Again, Success!
Would you like to try the project? Please consider using this design process worksheet with kids. Included in the package, there is a chart showing the Engineering Design Process, and a page for each design step explaining to students what to think and do in each step of the design process. Of course, there is a worksheet for kids to record their designs and changes through out the process. To download the free package, you just need fill out the form below and confirm the email.
Learning from the Egg Drop Design with Straw and Paper Project
The most important learning we had was that failure is not the end. It is the new start.
To be successful after failures, we have to make changes on design and execution, which requires observation and analysis on the failures.
We also learned the benefit of shared wisdom. Every one sees things from different angles and may have different ideas. It is a good skill to navigate the team dynamic and come up united solutions.
We are grateful for the cumulative knowledge we have based on the previous egg drop project using straw only. The learning from that challenge helped us quickly narrow down on the design choices for this egg drop project with straw and paper.
Paying attention to details helped too. It is the observations that the funnel landed on side and the funnel had a side open helped us decide on the final design that led to success.
Lastly, a test run in a small scale is a good way to get a feel about the project overall. In our case, we started with a funnel using half the regular size paper, which reinforced our believe that our design should work.
Design Factors Contributed to the Successful Egg Drop Design with Straw and Paper
The above learnings are about design process. Here are some design specific factors we believe contributed to the success of the egg drop challenge.
1.The overall funnel design that leading the force along the funnel side, thus away from the egg.
2.The distance between egg and the funnel tip is around 3 inches. If the distance is too short, the egg may still be impacted by the force when the funnel touches the ground.
3.The 360-degree symmetric funnel that ensured same air pressure and force on all sides of the funnel, which enabled the funnel to fall straight down, thus the tip being the part touched the ground.
4.The straws above the eggs sticking through the funnel sides that prevented the funnel side from touching the ground.
5.The scrambled paper on top of the egg acting as a cushion between the egg and the straws.
Extension Ideas for Egg Drop Project with Straw and Paper
We did not limit the paper or the straw that each design can use. To make it a harder challenge, you can limit the number of straws and pieces of paper that are allowed in the design.
After we successfully executed this egg drop design challenge, we come up the ideas of limiting the design with paper only. Stay tuned for our next Egg Drop Project Design with Paper only!
If you are trying the project, I highly recommend using a design worksheet with kids. You can download one by filling out the form below:
What to learn how we designed the Straw Only Egg Drop Project Successfully?

Want more STEM Challenge ideas for kids of all ages?
Minute to Win It STEM Challenge for Kids
STEM Challenge: Build Da Vinci Bridge with Pencils
STEM Challenge: Build the Tallest Flag Pole



Just make sure you don’t throw the straws away after